React Native
Initialization
In order to create ease for partners, we have divided the SDK into multiple modules. Each module represents a specific
app niche that partners can use based on their app category. For this step, we will only focus on the core sdk
The easiest way to integrate Kenkai React Native (Android) SDK in your project is using an NPM package. Add
dependencies of react-native SDK in the dependencies section of your package.json of your project and Android
Lifecycle Components in the app/build.gradle file.
"@kenkai-io/react-native-sdk":"<version_number>"
for
version_numberplease head to npm package.
After including the above, Open terminal/shell and go to your project directory, and run:
npm install
For React Native, the SDK should work out without any modifications, but to use notifications based nudges, we need to integrate the native modules in the app. For that you can follow the steps below based on your architecture.
if you are using expo to build your react-native application, Please follow the instructions on the expo guidelines to integrate native modules. As Kenkai react native SDK uses android native modules to utilise OS level APIs to ensure optimal results.
As SDK requires app events to auto manage the logging of user sessions you also need to include android lifecycle dependency in your android app/build.gradle file.
If you are using expo for your React Native application then you need to move to bare workflow by expo to integrate the SDK as the Kenkai SDK uses android native modules to utilise OS level APIs to ensure optimal results. You DO NOT need to eject from expo just for the Kenkai SDK. If you are using React Native CLI, you can skip to here the following steps
Steps for Expo
To make use of Kenkai SDK and continue with the same developer experience of Expo Go, you can migrate to using development builds. Development builds are like your own personal version of Expo Go — they include the native runtime that powers your app, and you control what is included in that native runtime by adding or removing packages in your package.json. Development builds allow you to continue to build your app in JavaScript while taking advantage of the full ecosystem of native packages available for Expo and React Native projects.
Open terminal window, go to your apps directory, and run the prebuild command.
npx expo prebuild
Using the run commands will initially prebuild your project to generate all of the native code within your project directory. If you manually modify the android or ios directory, you won't be able to safely re-run npx expo prebuild, this is known as the bare workflow.
Your app can still run in Expo Go, however, any custom native code won't be accessible if it's not already
present in the Expo Go app. After creating the prebuild, you need to update your scripts for start in
package.json and remove --dev-client if it is already added, update as:
"scripts": {
"start": "expo start",
...
},
In some cases you need to reconfigure your Expo modules after creating the prebuild which creates android and iOS folders in your project. To reconfigure expo modules run the following command in your project directory:
npx install-expo-modules@latest
Once you have the setup ready, you can create development builds for your android and iOS applications as:
# Run the app on android
npx expo run:android

# Run the app on iOS
npx expo run:ios
or you can create local development server as well:
npm run start
# Will run the script mentioned above in the package.json
This will generate the QR code for you that you can scan in Expo Go or by camera app in iOS to download builds.
SDK Initialization for Android
After following the above, you can open /android folder in android studio and continue with SDK initialization as
below.
Lifecycle components are required, if you already have them in your project you may skip them. To add the dependency, open your android folder in Android Studio and open the app-level build.gradle file and in your dependencies add the following:
dependencies {

    //LifecycleComponents
    implementation 'androidx.lifecycle:lifecycle-process:2.3.1'

}
Create an Application class in your project and include LifecycleEventObserver Components. Initialize Android SDK with your SDK Token from onCreate callback of your Application class as shown below.
public class MainApplication extends Application implements ReactApplication, LifecycleEventObserver {

    @Override
  public void onCreate() {
    super.onCreate();

      // to observe Application lifecycle events
      ProcessLifecycleOwner.get().getLifecycle().addObserver(this);

  }

    /*
        In onStateChanged() function include the following function to auto-track events related to app and activity lifecycle.
    */
    @Override
    public void onStateChanged(@NonNull LifecycleOwner source, @NonNull Lifecycle.Event event) {
        CfLogCoreNative().initPushNotifications(this, SDK_KEY_HERE);
    }
Don't forget to include android:name=".MyApplication" in your manifest's application tag.
Kenkai Android SDK also allows you to update track events after the user’s usage session is over. SDK sends the events whenever the app goes into the background. This helps in not overloading the user’s phone while in use. SDK handles the events even in offline mode and ensures that they get uploaded to the portal whenever the user connects to the internet. SDK also auto logs the App Open, close, and background events so, you don't have to implement those.
SDK Initialization for iOS
For ios initialization, you need to have a mac and Xcode installed and min deployment target as ios 13.0.
From your React Native project, head to /ios folder and run
pod install
this will install all the necessary pods for your including the Kenkai SDK pods too.
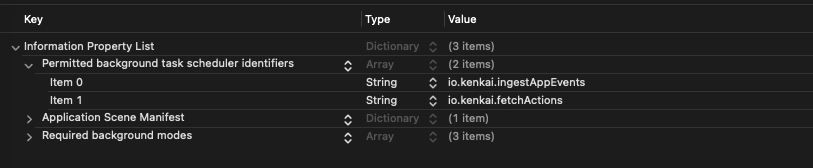
once the Pods are successfully installed, head to your info.plist file and add the following keys for
the Permitted background task scheduler identifiers
io.kenkai.ingestAppEvents
io.kenkai.fetchNudges

OR

<key>BGTaskSchedulerPermittedIdentifiers</key>
<array>
<string>io.kenkai.ingestAppEvents</string>
<string>io.kenkai.fetchNudges</string>
</array>
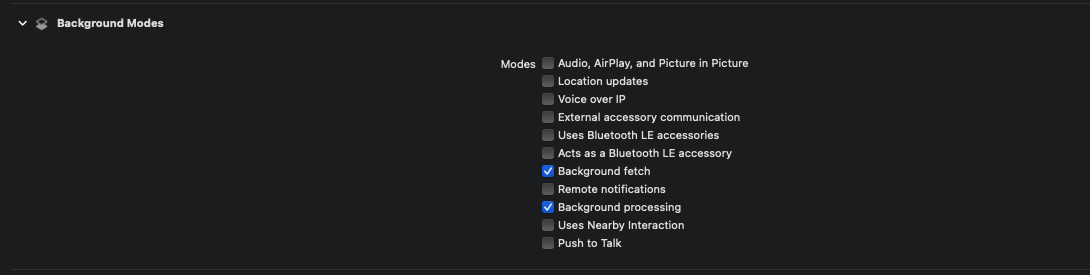
After adding the values in info.plist, head to the app Target project > Signing & Capabilities > Background Modes
and select the following 2:
- Background fetch
- Background processing
Once the background tasks are selected, create a new swift class named CFSDK, when creating a new swift class you will
be prompted to also create a Bridging-Header file, allow that as well and inside you bridging header class, add the
following header:
#import <React/RCTBridgeModule.h>
Once the above is added, head to your AppDelegate.mm for initialization of the above function.
    #import "<AppName>-Swift.h"

    Other imports (Not required for all apps)
    #import "AppDelegate.h"
    #import <ReactNativeNavigation/ReactNativeNavigation.h>
    #import <React/RCTBridge.h>
    #import <React/RCTBundleURLProvider.h>
    #import <React/RCTUtils.h>


    // Call the below inside didFinishLaunchingWithOptions before return inside AppDelegate

      [CfLogCoreWrapper configure];
Now try build your project, CF SDK should be initialized and ready to use.
Note that since we are using BGTaskScheduler for ios SDK, the events will not be sent exactly after the app the closed but will be sent at a later time on the availability of the resources by the OS.
Additional steps for Expo
Ejecting to bare workflow comes with a couple of additional steps dus to multiple architectural differences.
After ejecting from Expo, head to your node_modules > @kenkai-io > [SDK directory] and delete
the node_modules inside that directory. By default the node_modules of the project should be used to
overcome any dependency mismatch issues.
Kenkai SDK automatically starts tracking user data (e.g.,OS version, device IDs) and engagement with the basic setup above. This data can be stored on the device and uploaded in batches to reduce network and power usage, and to increase the likelihood of successful uploads while you can also upload the events as soon as they happen. The upload is done when the user device session ends. SDK also starts tracking user sessions with this basic setup.
Each event can further be understood in the context of its attributes which includes details like time, device details, locale, online/offline usage, screen time, interactions, and so on. This enables you to gain in-depth insights into user interactions across your app. You can also leverage this data to segment users, personalize messages and configure campaign targeting.